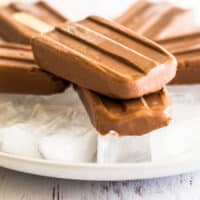
Fudgy, chocolatey Homemade Pudding Pops are surprisingly easy to make and SO good. You just need a popsicle mold, some milk, sugar, a little cornstarch, and chocolate.
Hey, when was the last time you had a pudding pop?
Maybe it’s been years.
Maybe you’ve never tried one. Well, you should fix that today, because these homemade pudding pops are THE BEST THINGS.

Like, I don’t want to over-hype these popsicles, but they are legitimately one of my favorite recipes I’ve made for the blog.
I was so excited about how good they turned out that I made everyone within a 2-mile radius try one, and then I was so sad when I realized I had shared them all away and instantly regretted my generosity.
The next batch I make, I’m not telling anyone about and hoarding them away at the back of my freezer.

What’s Great About These Pudding Pops
- They’re surprisingly easy to make. Pudding pops are basically just frozen chocolate pudding, and all you need to make a killer pudding from scratch is a handful of pantry staples and about 15 minutes of cooking time.
- Tons of chocolate flavor. Since these popsicles are made with real chocolate in the pudding, they pack a huge chocolate punch that is incredibly rich and satisfying.
Tools and Ingredient Notes
- Popsicle mold: If you like making homemade popsicles, a good popsicle mold is a must. This is the one I have, and I’ve been really happy with it. It doesn’t pick up odors or colors and is easy to clean.
- Fine-mesh strainer: After making your pudding, you’ll want to strain it through a fine-mesh strainer to remove any lumps. If you don’t own one, you can find them anywhere kitchenware is sold, and they’re typically inexpensive and handy to have around (this is the set I own).
- Cornstarch: Cornstarch is used to help thicken the pudding mixture. You cannot omit it from the recipe.
- Milk: Any percentage milk will work, but I prefer to use whole milk as it gives you a richer end result.
- Semi-sweet chocolate: Chopped chocolate or high-quality chips will work just fine here.
How to Make Pudding Pops
- Make your pudding base: In a medium saucepan, whisk together all ingredients except chocolate and vanilla until the mixture is thick enough to coat the back of your spoon.
- Stir in the chocolate: Add the chocolate and cook until the chocolate is completely incorporated before removing from heat and stirring in vanilla.
- Strain the pudding: Run the pudding through a fine-mesh strainer to remove any cornstarch lumps and allow the pudding to cool for 5 to 10 minutes.
- Transfer pudding to a popsicle mold: Transfer the pudding to your popsicle mold, add sticks, and freeze until solid.
- Serve and enjoy: Remove popsicles from the mold and enjoy!
FAQ
Can I make these without a popsicle mold?
Sure. You don’t need a store-bought popsicle mold to make popsicles. Small paper cups, ice cube trays, and baking tins can all be used as makeshift molds. (Check out this article for more ideas.)
BUT, if you like making popsicles at home, consider just investing in a popsicle mold. It’s worth it.
How to store pudding pops?
If you’re going to eat your pudding pops fairly quickly, you can just store them in the mold. But if it’s going to take you more than a couple days to eat your way through them, remove all the popsicles and wrap them individually in cling wrap or wax or parchment paper and store them in an airtight freezer bag or container to prevent freezer burn.

More Frozen Desserts
- Two-ingredient Cookies and Cream Popsicles
- Red Wine Popsicles
- No-churn Peanut Butter Oreo Ice Cream
- Frozen Hot Chocolate
- The Best Oreo Milkshake
- Strawberry Banana Milkshake
Homemade Pudding Pops
Equipment
- Popsicle mold
- Popsicle sticks
Ingredients
- ½ cup (100g) granulated sugar
- ¼ cup (30g) cornstarch
- ¼ teaspoon salt
- 3 cups milk whole preferred, but any percentage will work
- 1 cup (6oz) chopped semisweet chocolate good-quality chocolate chips are fine
- 1 teaspoon vanilla extract
Instructions
- In a medium saucepan, combine sugar, cornstarch, and salt. Slowly pour in milk, whisking continuously to keep lumps from forming.
- Heat over medium-low, whisking occasionally, until mixture is thick enough to coat the back of a spoon, about 10 to 15 minutes. Keep the heat low enough that the pudding thickens without coming to a simmer. If it begins to simmer, turn down the heat.
- Stir in chocolate and cook for 1 to 2 minutes more, until chocolate is completely incorporated. Stir in vanilla and remove from heat.
- Strain mixture through a fine-mesh strainer to remove any cornstarch lumps and allow to cool for 5 to 10 minutes. Pour mixture into your popsicle mold, leaving about 1/2-inch of space at the top. Cover, add sticks, and freeze for at least four hours until solid.
- Run mold under warm water to loosen popsicles and gently remove from mold. Enjoy!
Notes
Pudding Recipe Adapted From Smitten Kitchen
This post contains affiliate links, which means I receive a small commission if you make a purchase using them. There is absolutely no additional cost to you.

Honey Cat says
THESE LOOK AMAZING! I’m a teenager who loves to bake and these seem like an amazingly fun activity for kids and adults I don’t have popsicle molds so I covered a bread loaf pan in saran wrap and secured it with clothes pins, poured the pudding in and covered the top with aluminum foil. Then I just stuck popsicle sticks in and VOLIA, all I have to do is slice them once they’re frozen! I’m putting them in for 5-6 hours instead of 4 since it’s probably going to take longer to become solid! These remind me of the fudge popsicles I used to get in elementary school!
Julie says
Yum, thanks for sharing this recipe! I added a bit more chocolate (another 2 ounces, maybe), and some cinnamon and cayenne, and they are delicious. Plus it made a little extra than my molds can fit, so I got bonus regular pudding.
'Becca Ashley says
These really are good! I colored outside the lines just a little–I don’t have popsicle molds, so I used 3 oz disposable plastic cups instead, and I didn’t have wooden popsicle sticks either, so I stuck a plastic spoon in each filled cup. It all worked great! It still took 10 of the little cups, and the spoons are useful if you’re a slow eater and have to put your snack down and it gets melty. . .or, if you want to share with someone and not have to fool with getting your reusable stick back! Makes it more portable-friendly too–you have a holder for your treat if you need one. I also decided to make mine doubly delicious by using two different flavors of chips–chocolate and salty caramel! I made the entire base recipe, then I divided it in two and flavored one half with semi-sweet chocolate and the other half with salty caramel chips, filling each little cup with spoonfuls of each. They are. . .OUT OF THIS WORLD!! If you need a good excuse to make these again, this is it!
Tracy says
Lol that’s a perfect popsicle hack. So glad you enjoyed them, and I’m so happy the caramel chips worked!! That combo sounds seriously divine.
Lucia says
Pinning this! They’ll be perfect this weekend – the weather will be extra hot here in NJ!
Do you know if non-dairy milks would work… either lactose-free cow’s milk or plant-based milk?
Tracy says
Hi, Lucia. I’ve never used non-dairy/lactose-free milk for these, but it should work since they’re frozen. If you try it, please report back how they turn out!
Bethany says
I used to LOVE fudgesicles when I was young! These look all the better because they are homemade!!
Tracy says
Thanks, Bethany!
Dawn - Girl Heart Food says
Hey – I didn’t get any pops! Are they on route or something 😉 ? Just kiddin’! Look how generous you are! Don’t blame ya for hoarding the next batch you make…hehehe. Pinning!
I’m reading Blood, Bones and Butter by Gabrielle Hamilton. It’s an excellent read….though, I’m taking a bit of time to get through it cause summer, but would definitely recommend. And, then there’s a million magazines that I flick through, lol. Have a wonderful weekend, Tracy!
Tracy says
Hehe, your part of the world is a little farther away than two miles. But if it weren’t, you totally would have gotten one! 😉 I haven’t read anything by Gabrielle Hamilton before. I’ll have to check her out. Thanks for the rec!